Viewing live location monitoring events
This topic describes how to view live location monitoring events which have been imported into an existing case.
This feature requires option E10 Live location monitoring. If you do not have this option this feature is not available.
If you have set up real time smart track alerts as described in How to create a smart track alert then the live location monitoring event is automatically imported into OSS-ESPA and you can view it on
You can view the live location monitoring events on the Real time smart track location screen by either selecting the link in the email notification or selecting the link on the # alerts column in the Smart Track alerts & notifications section of the Manage case screen. To do the later:
-
For the case you want to view a smart track triggered alert on, open the Manage case screen.
 Need help finding your case?
On the main menu click View cases. The screen that opens depends on your setting of View cases. If it is set to:
- Advanced view, then the Advanced view cases screen opens.
- If your case is listed on the Favorite & recent cases tab, click the case name to open the Manage case screen.
- If it is not listed on the Favorite & recent cases tab, then click the Cases tab. Use the search filters to help locate your case. You can also click
 to open the FILTERS group which allows you to set your own default filter defining what is displayed on this tab, for example you may wish to set it to cases that you created which are currently open.
For further information refer to Searching for a case.
- Grid view, then the View cases screen opens.
- If your case is listed under My recent cases click it to open the Manage case screen.
- If it is not listed under My recent cases then select your case from the table, using the search filters to help locate it if required. Note, by default the search is set to only display cases that you created; if you are not the original creator but an assignee then ensure you set Case filter to Assigned cases before clicking Search.
- Tree view, then the View i-cases screen opens.
- Click
 at the top-right of the screen to open either the View Cases or Advanced view cases screen and follow the above description.
- Click
- Advanced view, then the Advanced view cases screen opens.
-
In the Smart Track alerts & notifications section select the # alerts for the alert name you are wanting to view.
The Smart Track triggered alerts screen opens displaying all the triggered alerts associated with the named alert.
- Click
 for the triggered alert you want to view. The Real time smart track location screen opens on a separate browser tab displaying the selected alert.
To view live location monitoring events on the ESPA analysis center screen:
- Click the link in the email notification.
- If you have the ESPA analysis center screen open and Display alert when new live ping arrived is selected on the Advanced options dialog box then when a new live location monitoring event arrives then a message is automatically displayed on the screen, click OK to close the dialog then click Refresh or Refresh data to include the event data on the Geo-loc data tab.
- If you have the ESPA analysis center screen open and Display alert when new live ping arrived is not selected on the Advanced options dialog box then when a new live location monitoring event arrives then you are only notified of the new ping data when you click Refresh or Refresh data or perform any other change on the ESPA analysis center screen that causes the screen to refresh. Once the refresh is complete the event data is included on the Geo-loc data tab.
If you want to view the new phone locations then:
-
On the Geo-loc data tab, set the Source column to have a filter of "Live ping" applied.
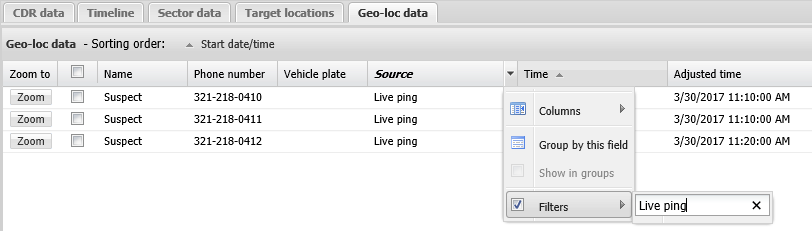
This means only the live location monitoring event records are displayed, and by default they are displayed in time order.
-
To zoom to the live location monitoring phone locations and to display them on the map use Zoom and the check box column next to it.

Select the check box to display the phone location on the map.
A marker is positioned on the map displaying the most likely location of the phone. You can also view confidence area of the position by selecting the check box beside the Conf column. The color of the confidence area is the same as that which you have selected for the phone number and the size of the circle is dependent on the radius specified in the live location monitoring event.
-
For the case you want to forward a smart track triggered alert on, open the Manage case screen.
Need help finding your case?
On the main menu click View cases. The screen that opens depends on your setting of View cases. If it is set to:
- Advanced view, then the Advanced view cases screen opens.
- If your case is listed on the Favorite & recent cases tab, click the case name to open the Manage case screen.
- If it is not listed on the Favorite & recent cases tab, then click the Cases tab. Use the search filters to help locate your case. You can also click to open the FILTERS group which allows you to set your own default filter defining what is displayed on this tab, for example you may wish to set it to cases that you created which are currently open.
For further information refer to Searching for a case.
- Grid view, then the View cases screen opens.
- If your case is listed under My recent cases click it to open the Manage case screen.
- If it is not listed under My recent cases then select your case from the table, using the search filters to help locate it if required. Note, by default the search is set to only display cases that you created; if you are not the original creator but an assignee then ensure you set Case filter to Assigned cases before clicking Search.
- Tree view, then the View i-cases screen opens.
- Click at the top-right of the screen to open either the View Cases or Advanced view cases screen and follow the above description.
- Click
- Advanced view, then the Advanced view cases screen opens.
-
In the Smart Track alerts & notifications section select the # alerts for the alert name you are wanting to view.
The Smart Track triggered alerts screen opens displaying all the triggered alerts associated with the named alert.
-
Use the check-box to select the alerts you want to forward then click Forward alert.
The Forward alert notifications screen opens.
- Select the agents, other case contacts and enter any additional emails of people you want to forward the triggered alert to.
-
Click Forward.
An email of the alert is sent to everyone you selected.